 |
| Test Blog 14 |
Tuesday, October 30, 2012
Tuesday, October 19, 2010
Different Background on Different Page
If you have read my past few posts, you might have already guessed that I will be using conditional codes heavily in this tutorial. Anyway, you actually have different background on different pages. What you need to achieve this? Well, you must at least know how to change your regular main page background using CSS code. You see, there are many page templates and each of them have different ways to address to something, so you must at least do a little homework and try to change it first on the main page.
You can Checkout my test blog for a sample result. Link tab and Contact tab have different backgrounds:
http://yoboytestblog.blogspot.com/
Anyhow, you can try the following to see if your background can be changed using the following code:
From your Dashboard - Design - Page Elements - Advanced - Add CSS and paste the following code, see if your background is changing.
From your Dashboard - Design - Edit HTML - Find for </b:skin> - Place the following code below </b:skin>
To use this code in your blog, you gotta change the URL of the page that you want your background to be different, and the URL of the background itself. If you want 5 pages to have 5 different backgrounds, then you will 5 codes (in my example I only used 2). Where to get the URL of your pages? Go Dashboard - New Post - Edit Pages - View and there it is in your address bar. Can you change the background of a 'Virtual Page' like label page? You sure can, just put it's URL there.
Wow, this is a one step tutorial. Have fun.
You can Checkout my test blog for a sample result. Link tab and Contact tab have different backgrounds:
http://yoboytestblog.blogspot.com/
Anyhow, you can try the following to see if your background can be changed using the following code:
From your Dashboard - Design - Page Elements - Advanced - Add CSS and paste the following code, see if your background is changing.
body{
background: url('http://farm3.static.flickr.com/2604/3977045139_c00ae395ca_b.jpg') center;
}
(Remove this code after testing)
Step 1:
From your Dashboard - Design - Edit HTML - Find for </b:skin> - Place the following code below </b:skin>
<b:if cond='data:blog.url == "http://yoboytestblog.blogspot.com/p/link.html"'>
<style>
body{
background: url('http://farm3.static.flickr.com/2604/3977045139_c00ae395ca_b.jpg') center;
}
</style>
</b:if>
<b:if cond='data:blog.url == "http://yoboytestblog.blogspot.com/p/contact.html"'>
<style>
body{
background: url('http://themes.googleusercontent.com/image?id=1OACCYOE0-eoTRTfsBuX1NMN9nz599ufI1Jh0CggPFA_sK80AGkIr8pLtYRpNUKPmwtEa') center;
}
</style>
</b:if>
To use this code in your blog, you gotta change the URL of the page that you want your background to be different, and the URL of the background itself. If you want 5 pages to have 5 different backgrounds, then you will 5 codes (in my example I only used 2). Where to get the URL of your pages? Go Dashboard - New Post - Edit Pages - View and there it is in your address bar. Can you change the background of a 'Virtual Page' like label page? You sure can, just put it's URL there.
Wow, this is a one step tutorial. Have fun.
Sunday, October 17, 2010
Adding an Already Added Gadget
In this quick tutorial, I will show you how to add an already added gadget. I am going to use Page Gadget as an example. As you might have guessed, if you have already added Page Gadget (and some other gadgets), you cant add it again for the second time. If for some strange reason you need the same gadget twice, this tutorial is for you.
If you already have a Page Gadget, remove it first before attempting this tutorial.
Go to Dashboard - Design - Page Element - Add a Gadget - And Right Click on the Plus sign next to the Pages Gadget - Copy Link Location (Using Firefox) - Close the window

Now, right click on your address bar - Paste - and click Enter. Then click Save. You will be back to your Page Elements and you can already see one page gadget. Do it one more time, right click on address bar - Paste - Save. Now you have two page gadgets. Position it wherever you want.

Enjoy.
If you already have a Page Gadget, remove it first before attempting this tutorial.
Step 1:
Go to Dashboard - Design - Page Element - Add a Gadget - And Right Click on the Plus sign next to the Pages Gadget - Copy Link Location (Using Firefox) - Close the window

Step 2:
Now, right click on your address bar - Paste - and click Enter. Then click Save. You will be back to your Page Elements and you can already see one page gadget. Do it one more time, right click on address bar - Paste - Save. Now you have two page gadgets. Position it wherever you want.

Enjoy.
Customize Tabs on Pages Gadget
This one is a real quicky. In this tutorial, you will learn how to customize the tabs and its links on the Pages gadgets.
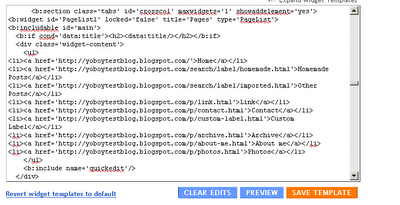
View your blog. Use Firefox (or any other browser that allows you to view it's source) - Right Click - View Page Source - copy everything from <ul> to </ul>
Mine looks something like this:
Customize the links however you want. URL goes after href, and the name of the tab is typed before </a>. And if you want your customizes tab to be your second tab, make it be your second line. So my customised tab looks something like this:
Copy this code, go to Dashboard - Design - Edit HTML - Check Expand Widget Templates - and delete everything before <ul> to </ul> and replace with the above code - Save template
That's it. Note that I have omitted a little effect of highlighted clicked tab for simplicity purposes. If you want this effect to be available, refer to the following tutorial as I mentioned in there how to achieve it.
http://southernspeakers.blogspot.com/2010/10/blogger-tips-setting-up-homepage_6156.html
Oh, and don't forget to back up your template before attempting anything. Have fun trying.
Step 1:
View your blog. Use Firefox (or any other browser that allows you to view it's source) - Right Click - View Page Source - copy everything from <ul> to </ul>
Mine looks something like this:
<li><a href='http://yoboytestblog.blogspot.com/'>Home</a></li>
<li><a href='http://yoboytestblog.blogspot.com/search/label/homemade.html'>Homemade Posts</a></li>
<li><a href='http://yoboytestblog.blogspot.com/search/label/imported.html'>Other Posts</a></li>
<li><a href='http://yoboytestblog.blogspot.com/p/link.html'>Link</a></li>
<li><a href='http://yoboytestblog.blogspot.com/p/contact.html'>Contact</a></li>
<li><a href='http://yoboytestblog.blogspot.com/p/archive.html'>Archive</a></li>
<li><a href='http://yoboytestblog.blogspot.com/p/photos.html'>Photos</a></li>
Step 2:
Customize the links however you want. URL goes after href, and the name of the tab is typed before </a>. And if you want your customizes tab to be your second tab, make it be your second line. So my customised tab looks something like this:
<li><a href='http://yoboytestblog.blogspot.com/'>Home</a></li>
<li><a href='http://yoboytestblog.blogspot.com/search/label/homemade.html'>Homemade Posts</a></li>
<li><a href='http://yoboytestblog.blogspot.com/search/label/imported.html'>Other Posts</a></li>
<li><a href='http://yoboytestblog.blogspot.com/p/link.html'>Link</a></li>
<li><a href='http://yoboytestblog.blogspot.com/p/contact.html'>Contact</a></li>
<li><a href='http://yoboytestblog.blogspot.com/p/archive.html'>Archive</a></li>
<li><a href='http://yoboytestblog.blogspot.com/p/photos.html'>Photos</a></li>
Step 3:
Copy this code, go to Dashboard - Design - Edit HTML - Check Expand Widget Templates - and delete everything before <ul> to </ul> and replace with the above code - Save template
That's it. Note that I have omitted a little effect of highlighted clicked tab for simplicity purposes. If you want this effect to be available, refer to the following tutorial as I mentioned in there how to achieve it.
http://southernspeakers.blogspot.com/2010/10/blogger-tips-setting-up-homepage_6156.html
Oh, and don't forget to back up your template before attempting anything. Have fun trying.
Saturday, October 16, 2010
Dedicated Separate Archive Page
This tutorial teaches you how to create a separate archive page, on a static page. That means, you'd be able to see a dedicated static page on your menu, on which you can click on to view your blog's archive. You can choose to display or not to display conventional archive gadget on the sidebar, that's totally up to you. Anyway, you can check out a sample here:
http://yoboytestblog.blogspot.com/p/archive.html
The idea behind this tutorial is to place the Archive gadget on all the pages, and then code it in such a way that it will only be visible on one selected static page. Before starting this tutorial, I am going to assume that you already have an Archive Static Page created and optionally Pages Gadget (menu bar) placed below your header.
If you don't already have an Archive Gadget, go to Dashboard - Design - Page Elements - Add a Gadget - Blog Archive - and place it above Blog Post (below will do fine as well) - Save

Doing this right, you will now see Archive gadget on top of every single page in your blog, including Static Pages.
Needless to say, that one defined page is our dedicated Archive page that you have created. If you have not already done so, go Posting - Edit Pages - New Page and just create a blank page with the title Archive.
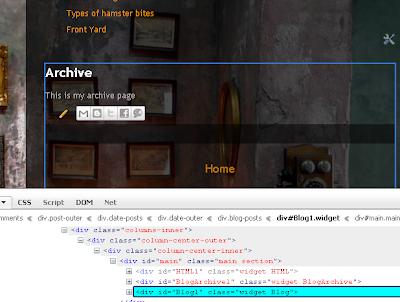
Before we can hide our Archive gadget, we need to know how to address it. As usual, use Firebug to analyze what is the ID or class of the archive gadget. As in my case, it is known with the ID BlogArchive1, as shown in the image below:

To hide archive gadget from all pages except for the dedicated Archive page, go to Dashboard - Design - Edit HTML - find for </b:skin> and place the following code directly below </b:skin>
This code will hide the archive gadget from all the pages except for the page that you input in the first line. To use this code in your blog, change the URL to your Archive page's URL, and change the gadget ID accordingly, if it is not the same.
Having completed this step, you will have your blog as it was with the addition of having Archive gadget placed on your Archive page.
Some of you might be already happy having completed step 2. But some of you might prefer to remove all the blog elements from the Archive page. So, use your firebug and find out which class or ID to address. Refer to the image below. Mine is known as Blog1. I believe almost all of you has the same ID as mine:
So, what I want to do now is, remove the blog post's elements from being shown on the archive page alone. To do this, go to Dashboard - Design - Edit HTML - Find for </b:skin> and place the following code directly below </b:skin>
To use this in your blog, like usual, change the URL, and I doubt if you have to change the blog post's ID. Save your template then.
You are done! You have placed your Archive gadget on only your archive page. If for some known reasons you find that your blog's margin has not been level, please refer to this tutorial on how to fix this margin.
http://yoboytestblog.blogspot.com/p/archive.html
The idea behind this tutorial is to place the Archive gadget on all the pages, and then code it in such a way that it will only be visible on one selected static page. Before starting this tutorial, I am going to assume that you already have an Archive Static Page created and optionally Pages Gadget (menu bar) placed below your header.
Step 1:
Objective: To place and reposition Archive Gadget
If you don't already have an Archive Gadget, go to Dashboard - Design - Page Elements - Add a Gadget - Blog Archive - and place it above Blog Post (below will do fine as well) - Save

Doing this right, you will now see Archive gadget on top of every single page in your blog, including Static Pages.
Step 2:
Objective: To hide archive gadget from being displayed in all pages, except for one defined page.
Needless to say, that one defined page is our dedicated Archive page that you have created. If you have not already done so, go Posting - Edit Pages - New Page and just create a blank page with the title Archive.
Before we can hide our Archive gadget, we need to know how to address it. As usual, use Firebug to analyze what is the ID or class of the archive gadget. As in my case, it is known with the ID BlogArchive1, as shown in the image below:

To hide archive gadget from all pages except for the dedicated Archive page, go to Dashboard - Design - Edit HTML - find for </b:skin> and place the following code directly below </b:skin>
<b:if cond="data:blog.url != "http://yoboytestblog.blogspot.com/p/archive.html"">
<style>
#BlogArchive1{
display:none;
}
</style>
</b:if>
This code will hide the archive gadget from all the pages except for the page that you input in the first line. To use this code in your blog, change the URL to your Archive page's URL, and change the gadget ID accordingly, if it is not the same.
Having completed this step, you will have your blog as it was with the addition of having Archive gadget placed on your Archive page.
Step 3:
Objective: Remove other page elements from Archive page
Some of you might be already happy having completed step 2. But some of you might prefer to remove all the blog elements from the Archive page. So, use your firebug and find out which class or ID to address. Refer to the image below. Mine is known as Blog1. I believe almost all of you has the same ID as mine:

So, what I want to do now is, remove the blog post's elements from being shown on the archive page alone. To do this, go to Dashboard - Design - Edit HTML - Find for </b:skin> and place the following code directly below </b:skin>
<b:if cond="data:blog.url == "http://yoboytestblog.blogspot.com/p/archive.html"">
<style>
#Blog1{
display:none;
}
</style>
</b:if>
To use this in your blog, like usual, change the URL, and I doubt if you have to change the blog post's ID. Save your template then.
You are done! You have placed your Archive gadget on only your archive page. If for some known reasons you find that your blog's margin has not been level, please refer to this tutorial on how to fix this margin.
Dedicated Separate Archive Page
This tutorial teaches you how to create a separate archive page, on a static page. That means, you'd be able to see a dedicated static page on your menu, on which you can click on to view your blog's archive. You can choose to display or not to display conventional archive gadget on the sidebar, that's totally up to you. Anyway, you can check out a sample here:
http://yoboytestblog.blogspot.com/
The idea behind this implementation is to display Achieve gadget in all the pages, and then code it in such a way that i will only be visible in the Archive page.
Step 1:
Objective: Create and place your Archive Gadget.
To do this, go to Dashboard - Design - Page Elements - Add a Gadget - Blog Archive
Virtual Static Page with Selected Posts in it
I realized that this is another common effect that bloggers are trying to achieve but has no direct solution to it. So this tutorial is made especially for you guys. In this tutorial, you will learn how to link to posts sorted by a specific label, and place this link on your Pages Gadget or Menu Bar or Navigation Bar. If you still don't know what I am talking about, imagine a link on your menu bar which you can click on, and this link will bring you to a page similar to your main page, but with only selected posts in it.
Some bloggers are looking ways to achieve this using static pages. Unfortunately, you can't do it using a static page. Blog posts are dynamic, and static pages are static, the two certainly don't mix. However, we can simulate this effect. In this tutorial you will learn how to simulate an effect of having posts in a static page which already have texts or images. So it'd look like a normal static page, but with selected posts on it. And you don't need to waste a static page to do this! From here on, I will be addressing this page as Virtual Static Page.
So, in short, what you will get is a menu which has extra tabs on it, and when you click that tab, you will be brought to a page which has posts that you have specifically selected. In addition, you could also have texts or images there to act like a header of that page. You can check out my test blog here:
http://yoboytestblog.blogspot.com
The idea is is to show a HTML/Javascript gadget in all pages, add a CSS code to hide this gadget from all pages except for one defined page. This page is the label filtered page, which will have only selected posts on.
As usual, I'd suggest you to use Firefox with Firebug addon installed.
Update: If your template supports a horizontal Link List display, you might want to use the Link List instead of Pages Gadget. The catch? Your clicked tabs won't be highlighted. If you don't mind about it, check out the following tutorial, which is way easier compared to this one.
http://southernspeakers.blogspot.com/2010/10/customised-menu-bar-with-link-list.html
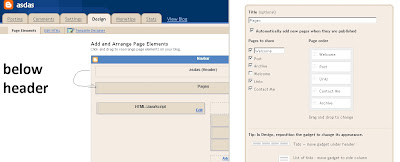
This is really easy. Go to Dashboard - Design - Page Elements - Add a Gadget - Pages. Place it below the header. Edit and customize the elements in the gadget as you want.
For example, if your page is about 'My Bedroom', and you want all the posts related to Bedroom to be shown there, this is where you want to write an introductory statement about this page. You might want to say something like 'This page contains all the posts related to My Bedroom' and place a picture with it. Alternatively, if you want less work (much less), you can ignore this step. So your virtual page will consist of only your posts and you won't be able to add additional texts or images to it.
To place texts or images on your virtual page, go to Dashboard - New Post - Compose and start designing how you want the texts and the images to be. Once you are done, click on 'Edit HTML' and copy the entire code there. Next, go to Dashboard - Design - Page Elements - Add a Gadget - HTML/Javascript - Paste your code there. After that, reposition this gadget to be above the Blog Posts box. Refer to the attached image below.

To do this, go to Dashboard - Edit Posts - thick the posts that you want to be displayed - Click the 'Label Actions' dropdown - New label - Enter a new label, but there are a certain rules that you must follow.
The labels must not contain spaces. So a single word will be preferable. If you must use two or more words, use dash (-) in between them, like 'my-bedroom'. Also, you must end the label with .html . Weird uh? There's a reason to it which you will understand. So your labels will look something like this:

You do not have to label posts this way if you don't want to include them in your virtual page.
Why do you wanna do this? Surely it looks awkward seeing a label with the .html tag as its suffix, so we'd disable all the labels from being shown in the posts. To do this, Dashboard - Design - Page Elements - Click edit on Blog Posts - Uncheck Labels - Save.
If you can't remove it for some unknown reason, you can code it out. Go to Design - Template Designer - Advanced - Add CSS - Paste the following code there.
Now comes the real thing. This is where you will do something to create a tab in the menu, which you can click on to bring you to the virtual page. While actual tabs are highlighted when it has been clicked on, I'm gonna remove this effect for simplicity purpose of this tutorial. If you insist on having this effect, please refer to my previous post.
To do this, view your blog (using Firefox preferably, or any other browser that allows you to view its page source). Then right click - View Page Source - and copy everything from <ul> to </ul>. Mine looks something like this.
Remove the texts class='selected', so it'd look something like this:
Now I am going to add the following extra line to the above lines:
If you want your virtual page to be on your second tab, then add the above line in place of your second line. The format of the line is as such:
The label that I used is homemade.html. I also have another label called imported.html. I want these two virtual pages to be my second and third tab. So my pagelink list will be as follows:
Now that we have customised our menu links, we want to put this into effect. Go to Dashboard - Design - Edit HTML - Click on Expand Widget Templates - find for the following lines:
Delete these lines and place our custom made lines. So this particular portion of our code will look something like this:
Click on save template then. You are almost done. If you did not place any text or images in your virtual page, there is nothing left for you to do. You can view your blog, and there will be extra tabs on which you can click on, and you'll be able to see the posts that you have picked (labelled) there. However, if you have chosen to place an image or text on this particular virtual page to make it look like a static page, there is one extra job to do.
In Step 2, you have placed an HTML/Javascript gadget on top of your Blog Post to act as an introductory design to your virtual page. The only problem is, this text/image is being shown in all the pages. So what we gonna do now is to specifically code the template to only show this design in the specifically defined virtual page.
To do this, first you want to know how to address the HTML/Javascript gadget. If this is your first HTML/Javascript gadget, by default it will be addressed with the id HTML1. However, just to be sure, use Firebug to inspect what is you actual gadget's ID. Mine is HTML1, as shown below:

Now that we have known our ID, we want to write a code specifically to make this gadget invisible on all the pages, except for one page that we define. This is the code that you want:
To use this code in your template, you'd have to change the URL to the virtual page's URL, and change the gadget ID if it is not same as mine. Next, we want to place this code in our template.
Go to Dashboard - Design - Edit HTML - and find for </b:skin> - and place the above code directly below it, and click save template.
You are done! If you have done everything correctly, when you visit your blog, you will see the same main page like always with your posts being there, and additionally you will have one (or more) tabs on your menu. You can click this tab, and it will bring you to a virtual static page which has it's own text or images and a bunch of selected posts.
After executing Step 6, you might notice that all the pages (except for your intended virtual page) has gone a little lower. Well, there's a quick fix to it. Use your firebug to inspect your blog's ID.

This page element can be addressed by the class column-center-inner (in my case). And I want to bring this element a little bit upward in all my pages, except for the virtual page (since the virtual page is already level as it is). So this is the code that I will be using:
To add this code, go to Design - Edit HTML - Find for </b:skin> - and place the above code directly below </b:skin>
You're almost done again!
In your blog, if you have a post which is newer compared to the latest post in your virtual page, you will be greeted with a tag that looks like this:

You can remove this by adding the following CSS code:
That is it. You are done. In this tutorial, I have only added one HTML gadget to introduce one Virtual Page, though I have two virtual pages in my menu. Similarly, you can two HTML gadgets to address both of the virtual pages. Be sure to go through Step 6 and Step 7 to make the texts and images to be shown at their respective pages.
Happy trying.
Some bloggers are looking ways to achieve this using static pages. Unfortunately, you can't do it using a static page. Blog posts are dynamic, and static pages are static, the two certainly don't mix. However, we can simulate this effect. In this tutorial you will learn how to simulate an effect of having posts in a static page which already have texts or images. So it'd look like a normal static page, but with selected posts on it. And you don't need to waste a static page to do this! From here on, I will be addressing this page as Virtual Static Page.
So, in short, what you will get is a menu which has extra tabs on it, and when you click that tab, you will be brought to a page which has posts that you have specifically selected. In addition, you could also have texts or images there to act like a header of that page. You can check out my test blog here:
http://yoboytestblog.blogspot.com
The idea is is to show a HTML/Javascript gadget in all pages, add a CSS code to hide this gadget from all pages except for one defined page. This page is the label filtered page, which will have only selected posts on.
As usual, I'd suggest you to use Firefox with Firebug addon installed.
Update: If your template supports a horizontal Link List display, you might want to use the Link List instead of Pages Gadget. The catch? Your clicked tabs won't be highlighted. If you don't mind about it, check out the following tutorial, which is way easier compared to this one.
http://southernspeakers.blogspot.com/2010/10/customised-menu-bar-with-link-list.html
Step 1:
Objective: Create a menu bar
This is really easy. Go to Dashboard - Design - Page Elements - Add a Gadget - Pages. Place it below the header. Edit and customize the elements in the gadget as you want.

Step 2:
Objective: Place texts/images that you want to be displayed on this 'virtual static page' that we are creating.
For example, if your page is about 'My Bedroom', and you want all the posts related to Bedroom to be shown there, this is where you want to write an introductory statement about this page. You might want to say something like 'This page contains all the posts related to My Bedroom' and place a picture with it. Alternatively, if you want less work (much less), you can ignore this step. So your virtual page will consist of only your posts and you won't be able to add additional texts or images to it.
To place texts or images on your virtual page, go to Dashboard - New Post - Compose and start designing how you want the texts and the images to be. Once you are done, click on 'Edit HTML' and copy the entire code there. Next, go to Dashboard - Design - Page Elements - Add a Gadget - HTML/Javascript - Paste your code there. After that, reposition this gadget to be above the Blog Posts box. Refer to the attached image below.

Step 3:
Objective: Choose the posts that you want to be displayed on this 'Virtual Static Page'
To do this, go to Dashboard - Edit Posts - thick the posts that you want to be displayed - Click the 'Label Actions' dropdown - New label - Enter a new label, but there are a certain rules that you must follow.
The labels must not contain spaces. So a single word will be preferable. If you must use two or more words, use dash (-) in between them, like 'my-bedroom'. Also, you must end the label with .html . Weird uh? There's a reason to it which you will understand. So your labels will look something like this:

You do not have to label posts this way if you don't want to include them in your virtual page.
Step 4:
Objective: Hide labels from each post.
Why do you wanna do this? Surely it looks awkward seeing a label with the .html tag as its suffix, so we'd disable all the labels from being shown in the posts. To do this, Dashboard - Design - Page Elements - Click edit on Blog Posts - Uncheck Labels - Save.
If you can't remove it for some unknown reason, you can code it out. Go to Design - Template Designer - Advanced - Add CSS - Paste the following code there.
.post-labels{
display: none;
}
Step 5:
Objective: Create Menu Tab for the Virtual Page
Now comes the real thing. This is where you will do something to create a tab in the menu, which you can click on to bring you to the virtual page. While actual tabs are highlighted when it has been clicked on, I'm gonna remove this effect for simplicity purpose of this tutorial. If you insist on having this effect, please refer to my previous post.
To do this, view your blog (using Firefox preferably, or any other browser that allows you to view its page source). Then right click - View Page Source - and copy everything from <ul> to </ul>. Mine looks something like this.
<li class="selected"><a href="http://yoboytestblog.blogspot.com/">Home</a></li>
<li><a href="http://yoboytestblog.blogspot.com/p/link.html">Link</a></li>
<li><a href="http://yoboytestblog.blogspot.com/p/contact.html">Contact</a></li>
<li><a href="http://yoboytestblog.blogspot.com/p/archive.html">Archive</a></li>
<li><a href="http://yoboytestblog.blogspot.com/p/photos.html">Photos</a></li>
Remove the texts class='selected', so it'd look something like this:
<li><a href="http://yoboytestblog.blogspot.com/">Home</a></li>
<li><a href="http://yoboytestblog.blogspot.com/p/link.html">Link</a></li>
<li><a href="http://yoboytestblog.blogspot.com/p/contact.html">Contact</a></li>
<li><a href="http://yoboytestblog.blogspot.com/p/archive.html">Archive</a></li>
<li><a href="http://yoboytestblog.blogspot.com/p/photos.html">Photos</a></li>
Now I am going to add the following extra line to the above lines:
<li><a href="http://yoboytestblog.blogspot.com/search/label/homemade.html">Homemade Posts</a></li>
If you want your virtual page to be on your second tab, then add the above line in place of your second line. The format of the line is as such:
<li><a href='http://<blog-url-here>/search/label/<label including .html suffix here>'>Text to be displayed on tabe here</a></li>
The label that I used is homemade.html. I also have another label called imported.html. I want these two virtual pages to be my second and third tab. So my pagelink list will be as follows:
<li><a href="http://yoboytestblog.blogspot.com/">Home</a></li>
<li><a href="http://yoboytestblog.blogspot.com/search/label/homemade.html">Homemade Posts</a></li>
<li><a href="http://yoboytestblog.blogspot.com/search/label/imported.html">Other Posts</a></li>
<li><a href="http://yoboytestblog.blogspot.com/p/link.html">Link</a></li>
<li><a href="http://yoboytestblog.blogspot.com/p/contact.html">Contact</a></li>
<li><a href="http://yoboytestblog.blogspot.com/p/archive.html">Archive</a></li>
<li><a href="http://yoboytestblog.blogspot.com/p/photos.html">Photos</a></li>
Now that we have customised our menu links, we want to put this into effect. Go to Dashboard - Design - Edit HTML - Click on Expand Widget Templates - find for the following lines:
<b:loop values="data:links" var="link">
<b:if cond="data:link.isCurrentPage">
<li class="selected"><a expr:href="data:link.href" href="http://www.blogger.com/post-edit.g?blogID=1430937011014702882&postID=6822714966089027203"><data:link.title></data:link.title></a></li>
<b:else>
<li><a expr:href="data:link.href" href="http://www.blogger.com/post-edit.g?blogID=1430937011014702882&postID=6822714966089027203"><data:link.title></data:link.title></a></li>
</b:else>
</b:if>
</b:loop>
Delete these lines and place our custom made lines. So this particular portion of our code will look something like this:

Click on save template then. You are almost done. If you did not place any text or images in your virtual page, there is nothing left for you to do. You can view your blog, and there will be extra tabs on which you can click on, and you'll be able to see the posts that you have picked (labelled) there. However, if you have chosen to place an image or text on this particular virtual page to make it look like a static page, there is one extra job to do.
Step 6:
Objective: Customize your Virtual Static Page by adding page-specific texts or images
In Step 2, you have placed an HTML/Javascript gadget on top of your Blog Post to act as an introductory design to your virtual page. The only problem is, this text/image is being shown in all the pages. So what we gonna do now is to specifically code the template to only show this design in the specifically defined virtual page.
To do this, first you want to know how to address the HTML/Javascript gadget. If this is your first HTML/Javascript gadget, by default it will be addressed with the id HTML1. However, just to be sure, use Firebug to inspect what is you actual gadget's ID. Mine is HTML1, as shown below:

Now that we have known our ID, we want to write a code specifically to make this gadget invisible on all the pages, except for one page that we define. This is the code that you want:
<b:if cond="data:blog.url != "http://yoboytestblog.blogspot.com/search/label/homemade.html"">
<style>
#HTML1{
display:none;
}
</style>
</b:if>
To use this code in your template, you'd have to change the URL to the virtual page's URL, and change the gadget ID if it is not same as mine. Next, we want to place this code in our template.
Go to Dashboard - Design - Edit HTML - and find for </b:skin> - and place the above code directly below it, and click save template.
You are done! If you have done everything correctly, when you visit your blog, you will see the same main page like always with your posts being there, and additionally you will have one (or more) tabs on your menu. You can click this tab, and it will bring you to a virtual static page which has it's own text or images and a bunch of selected posts.
Step 7 (Optional):
Objective: Margin Fix
After executing Step 6, you might notice that all the pages (except for your intended virtual page) has gone a little lower. Well, there's a quick fix to it. Use your firebug to inspect your blog's ID.

This page element can be addressed by the class column-center-inner (in my case). And I want to bring this element a little bit upward in all my pages, except for the virtual page (since the virtual page is already level as it is). So this is the code that I will be using:
<b:if cond="data:blog.url != "http://yoboytestblog.blogspot.com/search/label/homemade.html"">
<style>
.column-center-inner{
margin-top: -25px
}
</style>
</b:if>
To add this code, go to Design - Edit HTML - Find for </b:skin> - and place the above code directly below </b:skin>
You're almost done again!
Step 8 (Optional):
Objective: To remove the tag "Showing newest posts with label imported.html. Show older posts"
In your blog, if you have a post which is newer compared to the latest post in your virtual page, you will be greeted with a tag that looks like this:

You can remove this by adding the following CSS code:
.status-msg-wrap{
display: none;
}
Go to Design - Template Designer - Advanced - Add CSS - Paste the above code there.
That is it. You are done. In this tutorial, I have only added one HTML gadget to introduce one Virtual Page, though I have two virtual pages in my menu. Similarly, you can two HTML gadgets to address both of the virtual pages. Be sure to go through Step 6 and Step 7 to make the texts and images to be shown at their respective pages.
Happy trying.
Subscribe to:
Posts (Atom)